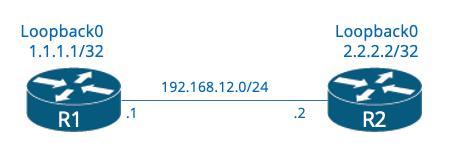
図のルータ間で、1.1.1.1/32から2.2.2.2/32間を接続するサイト間IPSecVPN設定をステップを踏みながら、確認していきます。
サイト間VPN設定
ネットワーク設定
各Loopbackアドレスへ到達できるようルーティング設定をします。
R1(config)# ip route 0.0.0.0 0.0.0.0 192.168.12.2
R2(config)# ip route 0.0.0.0 0.0.0.0 192.168.12.1
フェーズ1設定
まず、最初にこのフェーズの設定でISAKMP SAを確立します。ここで必要なパラメータは最低以下4つです。
- 暗号化アルゴリズム
- ハッシュアルゴリズム
- Diffie-Hellman グループ
- 認証方法
今回は、以下のパラメータ値とします。
- 暗号化アルゴリズム:AES256
- ハッシュアルゴリズム:SHA512
- Diffie-Hellman グループ:14(2048 ビット )
- 認証方法 :事前共有鍵 キーは CISCO
設定は以下です。
R1(config)# crypto isakmp policy 10
R1(config-isakmp)# encr aes 256
R1(config-isakmp)# hash sha512
R1(config-isakmp)# authentication pre-share
R1(config-isakmp)# group 14
R2(config)# crypto isakmp policy 10
R2(config-isakmp)# encr aes 256
R2(config-isakmp)# hash sha512
R2(config-isakmp)# authentication pre-share
R2(config-isakmp)# group 14
次に、ISAKMPトンネルを確立するために使用するISAKMPピアと鍵を設定します。
R1(config)# crypto isakmp key CISCO address 192.168.12.2
R2(config)# crypto isakmp key CISCO address 192.168.12.1
フェーズ1に必要な基本的な設定は完了です。次は、フェーズ2に進みます。
フェーズ2設定
このフェーズでは、データを安全に送信できるように、ピア間のIPSecSAを確立することです。 このフェーズの設定では、以下、4つのパラメータが最低必要です。
- 暗号化アルゴリズム
- ハッシュアルゴリズム
- 暗号化モード(トンネル、トランスポート)
- ProxyID(どことどこのトラフィックを暗号化しないといけないのか)
今回は、以下のパラメータ値とします。
- 暗号化アルゴリズム:AES192
- ハッシュアルゴリズム:SHA384
- 暗号化モード:トンネル
- ProxyID:1.1.1.1/32と2.2.2.2/32間の双方向
最初にIPSec変換セット(transform set)を作成し、暗号化、およびハッシュアルゴリズムを設定します。
R1(config)# crypto ipsec transform-set R1-R2-Phase2 esp-aes 192 esp-sha384-hmac
R2(config)# crypto ipsec transform-set R1-R2-Phase2 esp-aes 192 esp-sha384-hmac
IPSec 変換セット(transform set)設定時に暗号化モードが設定できます。Ciscoのデフォルトはトンネルモードです。設定は以下です。
R1(config)# crypto ipsec transform-set R1-R2-Phase2 esp-aes 192 esp-sha384-hmac
R1(cfg-crypto-trans)# mode tunnel
R2(config)# crypto ipsec transform-set R1-R2-Phase2 esp-aes 192 esp-sha384-hmac
R2(cfg-crypto-trans)# mode tunnel
次にProxy-IDを指定するため、暗号化対象のローカルサブネットとリモートサブネットをアクセスリストとして設定します。 送信元はローカルサブネット、宛先はリモートサブネットとなるため、ルータ間では、送信元と宛先が逆になります。
R1(config)# access-list 100 permit ip host 1.1.1.1 host 2.2.2.2
R2(config)# access-list 100 permit ip host 2.2.2.2 host 1.1.1.1
crypto mapを作成し、今まで設定してきたパラメータとIPSecトンネルの接続先を定義します。
R1(config)# crypto map R1_TO_R2 10 ipsec-isakmp
R1(config-crypto-map)# set peer 192.168.12.2
R1(config-crypto-map)# set transform-set R1-R2-Phase2
R1(config-crypto-map)# match address 100
R2(config)# crypto map R2_TO_R1 10 ipsec-isakmp
R2(config-crypto-map)# set peer 192.168.12.1
R2(config-crypto-map)# set transform-set R1-R2-Phase2
R2(config-crypto-map)# match address 100
インタフェース設定
設定したcrypto mapをインタフェースに割り当てます。
R1(config)# interface fastEthernet 0/0.12
R1(config-subif)# crypto map R1_TO_R2
R2(config)# interface fastEthernet 0/0.12
R2(config-subif)# crypto map R2_TO_R1
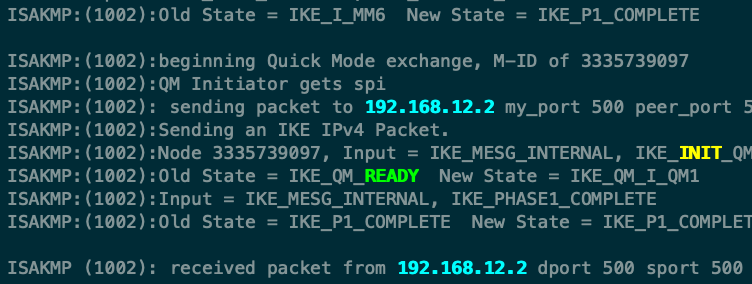
設定すると、以下のようなログが出力されます。
*Jun 12 12:43:11.731: %CRYPTO-6-ISAKMP_ON_OFF: ISAKMP is ON
確認
疎通確認
R1からR2へPingを実行します。
R1#ping 2.2.2.2 source 1.1.1.1
Type escape sequence to abort.
Sending 5, 100-byte ICMP Echos to 2.2.2.2, timeout is 2 seconds:
Packet sent with a source address of 1.1.1.1
.!!!!
Success rate is 80 percent (4/5), round-trip min/avg/max = 20/23/28 ms
ISAKMP SAの確認
ISAKMP SAのステータスを確認します。
R1#show crypto isakmp sa
IPv4 Crypto ISAKMP SA
dst             src             state          conn-id status
192.168.12.2    192.168.12.1    QM_IDLE           1001 ACTIVE


IPv6 Crypto ISAKMP SA
IKEフェーズ1が正常に完了すると、StateがQM_IDLEになります。
IPSecSAの確認
以下のコマンドで、#pkts encaps/encrypt/decap/decryptのカウンタが上がることで、暗号化、復号化されていること確認できます。
R1#show crypto ipsec sa


interface: FastEthernet0/0.12
    Crypto map tag: R1_TO_R2, local addr 192.168.12.1


   protected vrf: (none)
   local  ident (addr/mask/prot/port): (1.1.1.1/255.255.255.255/0/0)
   remote ident (addr/mask/prot/port): (2.2.2.2/255.255.255.255/0/0)
   current_peer 192.168.12.2 port 500
     PERMIT, flags={origin_is_acl,}
    #pkts encaps: 9, #pkts encrypt: 9, #pkts digest: 9
    #pkts decaps: 9, #pkts decrypt: 9, #pkts verify: 9
    #pkts compressed: 0, #pkts decompressed: 0
    #pkts not compressed: 0, #pkts compr. failed: 0
    #pkts not decompressed: 0, #pkts decompress failed: 0
    #send errors 0, #recv errors 0


     local crypto endpt.: 192.168.12.1, remote crypto endpt.: 192.168.12.2
     path mtu 1500, ip mtu 1500, ip mtu idb FastEthernet0/0.12
     current outbound spi: 0x4B9CEBB2(1268575154)
     PFS (Y/N): N, DH group: none


     inbound esp sas:
      spi: 0x1C4AF696(474674838)
        transform: esp-192-aes esp-sha384-hmac ,
        in use settings ={Tunnel, }
        conn id: 1, flow_id: SW:1, sibling_flags 80000040, crypto map: R1_TO_R2
        sa timing: remaining key lifetime (k/sec): (4263399/2797)
        IV size: 16 bytes
        replay detection support: Y
        Status: ACTIVE(ACTIVE)


     inbound ah sas:


     inbound pcp sas:


     outbound esp sas:
      spi: 0x4B9CEBB2(1268575154)
        transform: esp-192-aes esp-sha384-hmac ,
        in use settings ={Tunnel, }
        conn id: 2, flow_id: SW:2, sibling_flags 80000040, crypto map: R1_TO_R2
        sa timing: remaining key lifetime (k/sec): (4263399/2797)
        IV size: 16 bytes
        replay detection support: Y
        Status: ACTIVE(ACTIVE)


     outbound ah sas:

     outbound pcp sas:
また、以下のコマンドで簡単にSAの状態を確認できます。
R1#show crypto session
Crypto session current status


Interface: FastEthernet0/0.12
Session status: UP-ACTIVE
Peer: 192.168.12.2 port 500
  IKEv1 SA: local 192.168.12.1/500 remote 192.168.12.2/500 Active
  IPSEC FLOW: permit ip host 1.1.1.1 host 2.2.2.2
        Active SAs: 2, origin: crypto map
Session statusがUP-ACTIVEとは、IPSecSAがアップしていて、正常な状態を表します。
コメント