DMVPNは、フェーズ1〜3までの3つのバージョンがあります。この記事はフェーズ1について取り上げます。
フェーズ1では、NHRPを使用して、スポークはハブルータに自身を登録します。ハブルータは、マルチポイントGREにより全てのスポークとGREトンネルを張ります。ただし、すべてのスポークはハブルータへの静的トンネルのままなので、動的なスポーク間接続はありません。スポーク間の通信はハブルータを折り返すため、ハブルータの処理負荷が高くなります。
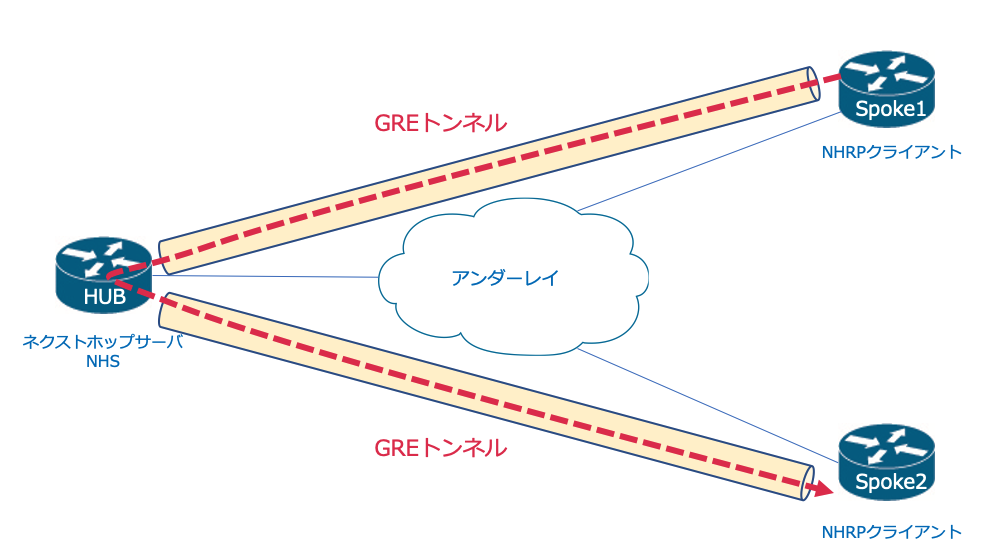
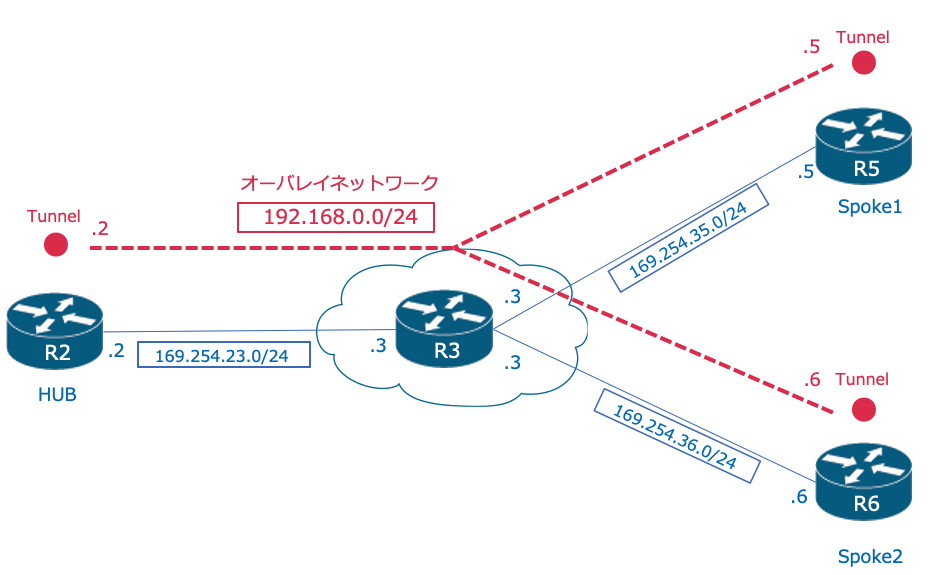
それでは以下の構成でDMVPN フェーズ1の設定、動作確認をします。
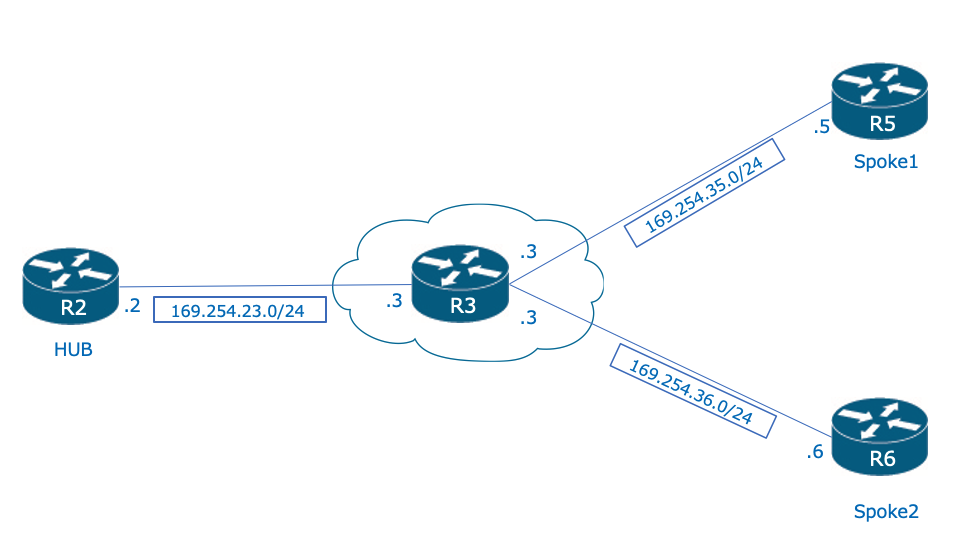
アンダーレイの設定
まず、パブリックネットワークであるアンダーレイネットワークの設定をします。アンダーレイネットワークは169.254.0.0/16のサブネットで構成されており、このサブネット間で疎通ができればOKです。
R2(config)#interface FastEthernet0/0.23
R2(config-subif)# encapsulation dot1Q 23
R2(config-subif)# ip address 169.254.23.2 255.255.255.0
R2(config-subif)#exit
R2(config)#ip route 169.254.0.0 255.255.0.0 169.254.23.3
R3(config)#interface FastEthernet0/0.23
R3(config-subif)# encapsulation dot1Q 23
R3(config-subif)# ip address 169.254.23.3 255.255.255.0
R3(config)#interface FastEthernet0/0.35
R3(config-subif)# encapsulation dot1Q 35
R3(config-subif)# ip address 169.254.35.3 255.255.255.0
R3(config)#interface FastEthernet0/0.36
R3(config-subif)# encapsulation dot1Q 36
R3(config-subif)# ip address 169.254.36.3 255.255.255.0
R5(config)#interface FastEthernet0/0.35
R5(config-subif)# encapsulation dot1Q 35
R5(config-subif)# ip address 169.254.35.5 255.255.255.0
R5(config-subif)#exit
R5(config)#ip route 169.254.0.0 255.255.0.0 169.254.35.3
R6(config)#interface FastEthernet0/0.36
R6(config-subif)# encapsulation dot1Q 36
R6(config-subif)# ip address 169.254.36.6 255.255.255.0
R6(config-subif)#exit
R6(config)#ip route 169.254.0.0 255.255.0.0 169.254.36.3
ハブルータであるR2からR5、R6へ疎通確認します。
R2#ping 169.254.35.5
Type escape sequence to abort.
Sending 5, 100-byte ICMP Echos to 169.254.35.5, timeout is 2 seconds:
!!!!!
Success rate is 100 percent (5/5), round-trip min/avg/max = 24/36/48 ms
R2#ping 169.254.36.6
Type escape sequence to abort.
Sending 5, 100-byte ICMP Echos to 169.254.36.6, timeout is 2 seconds:
!!!!!
Success rate is 100 percent (5/5), round-trip min/avg/max = 4/24/44 ms
ハブルータ(R2)の設定

まず、ハブルータから設定します。
R2(config)#interface Tunnel0
R2(config-if)# ip address 192.168.0.2 255.255.255.0
R2(config-if)# ip nhrp authentication DMVPNPWD
R2(config-if)# ip nhrp map multicast dynamic
R2(config-if)# ip nhrp network-id 1
R2(config-if)# tunnel source 169.254.23.2
R2(config-if)# tunnel mode gre multipoint
GREトンネルの通常設定以外に、DMVPNのハブで必要な設定を確認します。
| コマンド | 説明 |
| ip nhrp authentication <password> | このコマンドによりNHRPで接続する際のパスワードを指定します。これはオプションです。 |
| ip nhrp map multicast dynamic | このコマンドにより、スポークのNMBAアドレスを静的に設定しなくても、各スポークへマルチキャストトラフィックを送信することができます。これはダイナミックルーティング(OSPFなど)を使用する際に重要です。 |
| ip nhrp network-id | ルータが複数のDMVPNに接続する際に、それぞれを区別するために使うIDです。ローカルでのみ有効ですが、通常は対向のルータとIDを合わせます。 |
スポーク1(R5)の設定
スポークルータを設定します。
R5(config)#interface Tunnel0
R5(config-if)# ip address 192.168.0.5 255.255.255.0
R5(config-if)# ip nhrp authentication DMVPNPWD
R5(config-if)# ip nhrp map 192.168.0.2 169.254.23.2
R5(config-if)# ip nhrp map multicast 169.254.23.2
R5(config-if)# ip nhrp network-id 1
R5(config-if)# ip nhrp nhs 192.168.0.2
R5(config-if)# tunnel source 169.254.35.5
R5(config-if)# tunnel destination 169.254.23.2
GREトンネルの通常設定以外に、DMVPNのスポークで必要な設定を確認します。
| コマンド | 説明 |
| ip nhrp map 192.168.0.2 169.254.23.2 | ハブのトンネルアドレス(192.168.0.2)とハブのNBMAアドレス(169.254.23.2)を静的マッピングします。 |
| ip nhrp map multicast 169.254.23.2 | トンネルインターフェイスを介してマルチキャストが送信されるハブルータのアドレスを設定します。気をつけることは、NBMAアドレスを設定することです。OSPFなどのルーティングプロトコルにはマルチキャストを使用するため、このコマンドが必要です |
| ip nhrp nhs 192.168.0.2 | ネクストホップサーバー(ハブルータ)を指定します |
R2(ハブ)とR5(スポーク)の設定が終わると、トンネルインターフェースがアップします。
%LINEPROTO-5-UPDOWN: Line protocol on Interface Tunnel0, changed state to up
R2(ハブ)でR5(スポーク)と接続できているかshow dmvpnで確認します。
R2#show dmvpn
Legend: Attrb --> S - Static, D - Dynamic, I - Incomplete
        N - NATed, L - Local, X - No Socket
        # Ent --> Number of NHRP entries with same NBMA peer
        NHS Status: E --> Expecting Replies, R --> Responding, W --> Waiting
        UpDn Time --> Up or Down Time for a Tunnel
==============================================================


Interface: Tunnel0, IPv4 NHRP Details
Type:Hub, NHRP Peers:2,


# Ent  Peer NBMA Addr Peer Tunnel Add State  UpDn Tm Attrb
----- --------------- --------------- ----- -------- -----
     1 169.254.35.5        192.168.0.5    UP 00:12:30     D
スポークのNBMAアドレスとトンネルアドレスのマッピングができていて、StateがUPであることが確認できます。
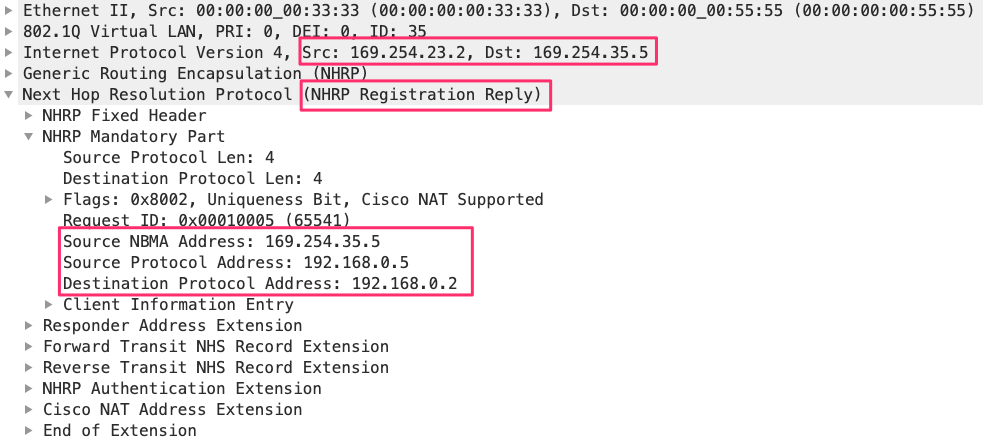
R2でパケットキャプチャし、R5からのNHRP Registration Requestを確認します。 R5はアンダーレイのアドレスを使用して、自身のトンネルアドレスとNBMAアドレスを通知しています。
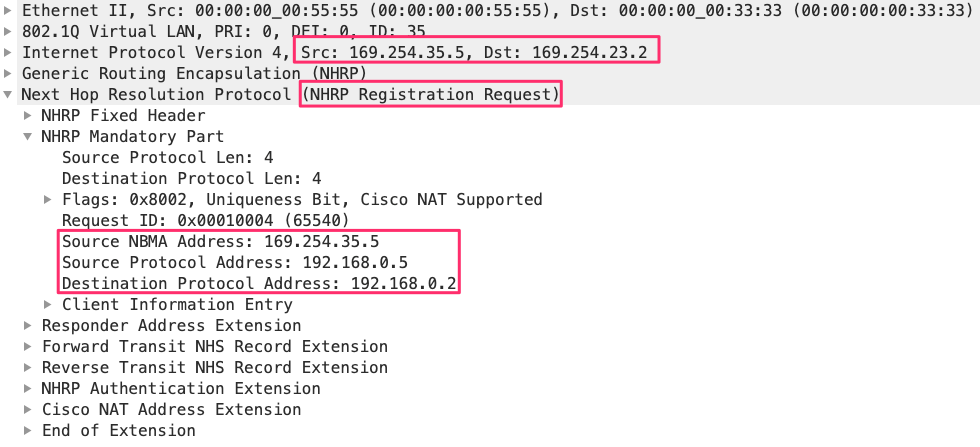
これに対して、R2はNHRP Registration Replyを応答しています。
スポーク2(R6)の設定
スポーク2の設定は、スポーク1の設定からトンネルインタフェースのIPアドレスとトンネルソースのIPアドレスを変更するだけでOKです。
R6(config)#interface Tunnel0
R6(config-if)# ip address 192.168.0.6 255.255.255.0
R6(config-if)# ip nhrp authentication DMVPNPWD
R6(config-if)# ip nhrp map 192.168.0.2 169.254.23.2
R6(config-if)# ip nhrp map multicast 169.254.23.2
R6(config-if)# ip nhrp network-id 1
R6(config-if)# ip nhrp nhs 192.168.0.2
R6(config-if)# tunnel source 169.254.36.6
R6(config-if)# tunnel destination 169.254.23.2
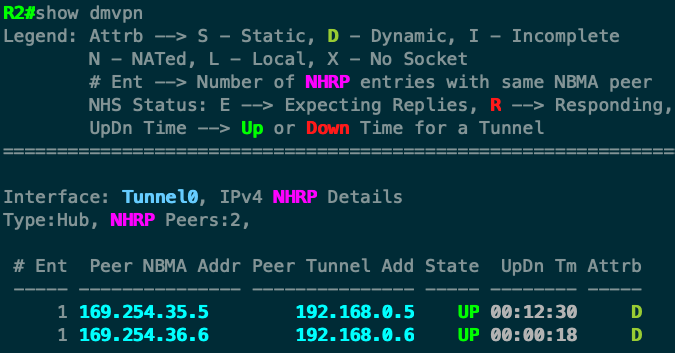
R2(ハブ)でR6(スポーク)と接続できているかshow dmvpnで確認します。
R2#show dmvpn
Legend: Attrb --> S - Static, D - Dynamic, I - Incomplete
        N - NATed, L - Local, X - No Socket
        # Ent --> Number of NHRP entries with same NBMA peer
        NHS Status: E --> Expecting Replies, R --> Responding, W --> Waiting
        UpDn Time --> Up or Down Time for a Tunnel
=========================================================


Interface: Tunnel0, IPv4 NHRP Details
Type:Hub, NHRP Peers:2,


# Ent  Peer NBMA Addr Peer Tunnel Add State  UpDn Tm Attrb
----- --------------- --------------- ----- -------- -----
     1 169.254.35.5        192.168.0.5    UP 00:12:30     D
     1 169.254.36.6        192.168.0.6    UP 00:00:18     D
疎通試験
これで、DMVPNによるオーバーレイネットワーク(192.168.0/24)ができたはずです。 R2(ハブ)からR5、R6(スポーク)へ疎通してみます。
R2#ping 192.168.0.5
Type escape sequence to abort.
Sending 5, 100-byte ICMP Echos to 192.168.0.5, timeout is 2 seconds:
!!!!!
Success rate is 100 percent (5/5), round-trip min/avg/max = 24/33/40 ms
R2#ping 192.168.0.6
Type escape sequence to abort.
Sending 5, 100-byte ICMP Echos to 192.168.0.6, timeout is 2 seconds:
!!!!!
Success rate is 100 percent (5/5), round-trip min/avg/max = 40/43/48 ms
スポーク間、例えば、R6からR5への疎通を確認します。
R6#ping 192.168.0.5
Type escape sequence to abort.
Sending 5, 100-byte ICMP Echos to 192.168.0.5, timeout is 2 seconds:
!!!!!
Success rate is 100 percent (5/5), round-trip min/avg/max = 52/67/92 ms
R6からR5のPingをR2(HUB)でパケットキャプチャすると、R5、R6間のPing 1往復でパケットが4つ出力されています。 これにより、R2をハブルータとして、折り返して通信していることがわかります。

最後までお読み頂きありがとうございました。
コメント