
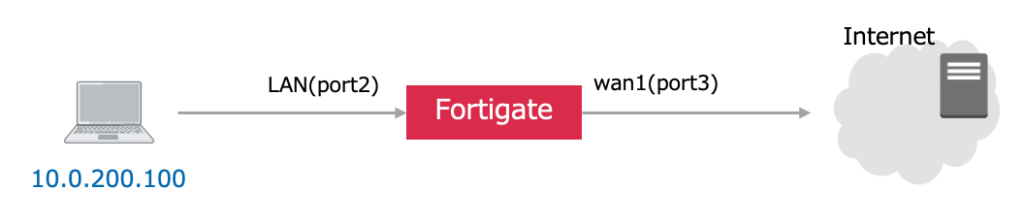
ネットワークの障害切り分けを目的に、Fortigateを通過するパケットをキャプチャすることができます。 パケットキャプチャはGUI/CLIから取得できます。
GUIでの取得
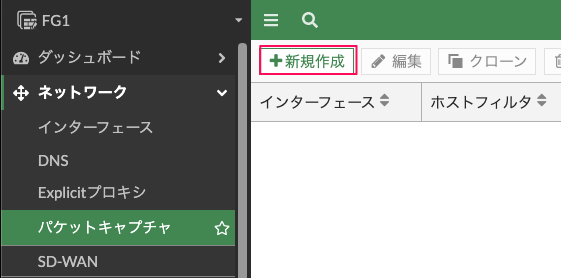
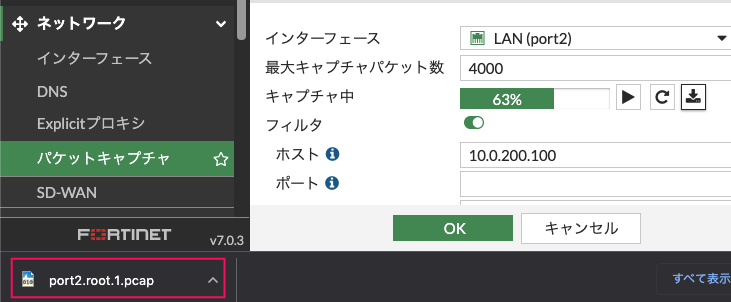
port2を通過するパケットを取得します。 GUIで、ネットワーク >> パケットキャプチャ >> 新規作成を選択します。
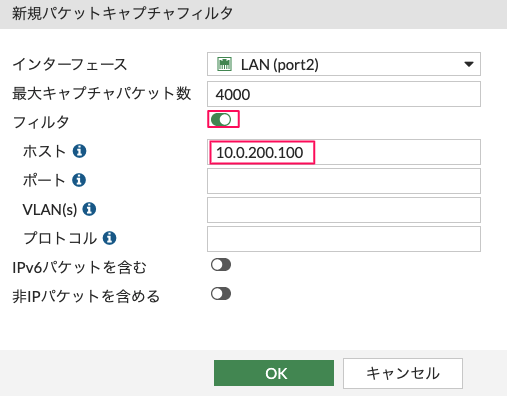
すると下のような画面に遷移します。
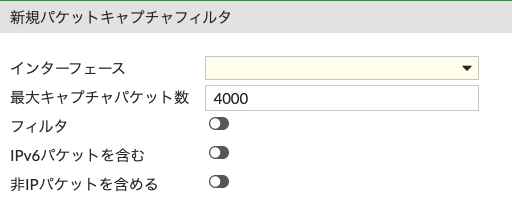
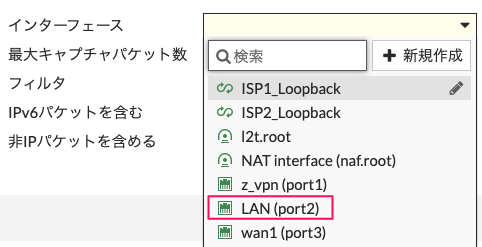
インタフェースで、通過パケットを取得したいインタフェースを指定します。今回は、port2 (LAN(port2))を指定します。
最大キャプチャパケット数は、デフォルト4000のままとします。キャプチャ数に制限があるため、通常はIPアドレスやポート番号をフィルタして取得するのが望ましいです。
今回は、端末の10.0.200.100にフィルタするものとします。 フィルタを有効にして、ホストに10.0.200.100を入力し、OKをクリックします。
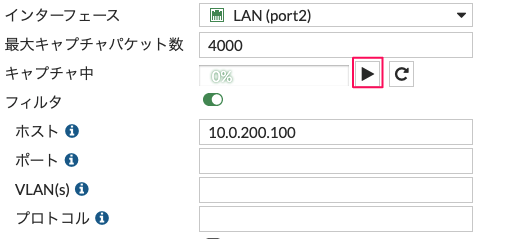
以下のような画面となります。これではまだ、キャプチャは開始されていません。

LAN(port2)をダブルクリックします。キャプチャ中という項目が増えています。▶︎の再生マークをクリックします。
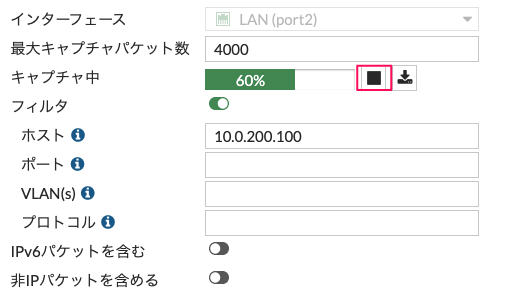
キャプチャが開始され、最大キャプチャパケット数の何パーセントが取得されているか確認できます。停止するには、■をクリックします。
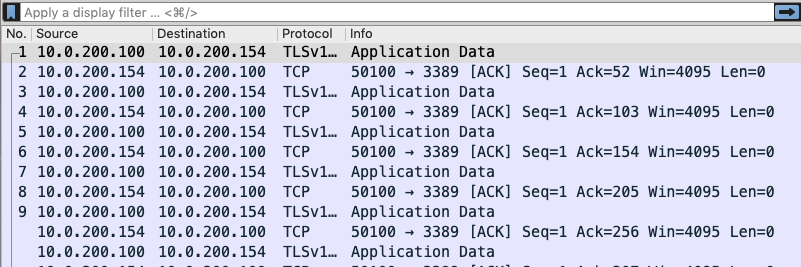
停止後、ダウンロードボタンをクリックすると、pcapファイルが取得できます。
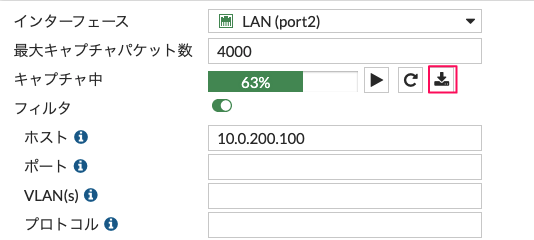
ファイル名として、port2.root.1.pcapというファイルがダウンロードされます。
pcapファイルをWireSharkで開くと、キャプチャデータが参照できます。
CLIでの取得
CLIでは、パケット全体ではなく、送信元や宛先、プロトコルなどを条件にパケットが通過しているのか否か、ヘッダ情報のトレースをすることができます。
下記、記事を参考に、キャプチャの動作を確認しました。
>> 参考記事 : Troubleshooting Tip: Using the FortiOS built-in packet sniffer
diagnose sniffer packet <インタフェース> “<フィルタ条件>” <詳細レベル> <取得回数> <タイムスタンプ>
- インタフェース:取得するインタフェースを指定します。すべてのインタフェースを指定する場合はany
- フィルタ条件:取得するパケットの条件(IP、プロトコルなど)を定義します。”none”とすると、条件を指定しない(全てパケット)となります。
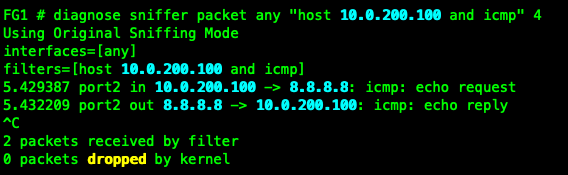
- 詳細レベル(Verbose levels):情報取得のレベル(1〜6)を定義します。私がよく使用するのは、4 です。どのインタフェースにパケットが入って、どのインタフェースから出力しているのかがトレースでき、便利です。
Verbose levels in detail:
1: print header of packets
2: print header and data from ip of packets
3: print header and data from ethernet of packets (if available)
4: print header of packets with interface name
5: print header and data from ip of packets with interface name
6: print header and data from ethernet of packets (if available) with intf name
https://community.fortinet.com/t5/FortiGate/Troubleshooting-Tip-Using-the-FortiOS-built-in-packet-sniffer/ta-p/194222?externalID=11186
- 取得回数:取得するパケット数。指定しない、もしくは0の場合は、無制限となり、Ctrl+Cで停止させます。
- タイムスタンプ:フォーマットを指定。a: UTC時刻表示 l (Lの小文字): ローカル時刻表示
インタフェース指定
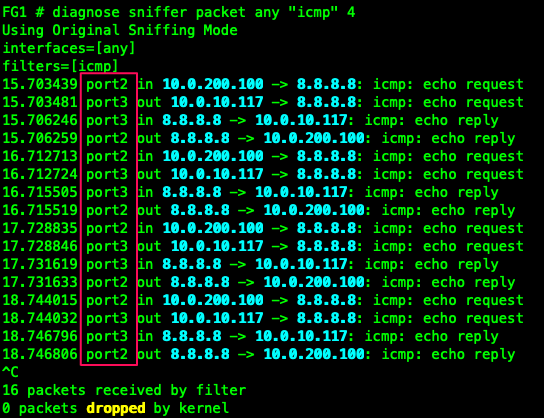
すべてのインタフェースを通過するICMPパケットをキャプチャ(詳細レベル4)
diagnose sniffer packet any “icmp” 4
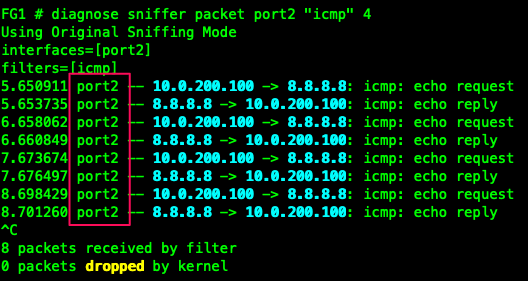
port2を通過するICMPパケットをキャプチャ(詳細レベル4)
diagnose sniffer packet port2 “icmp” 4
詳細レベル
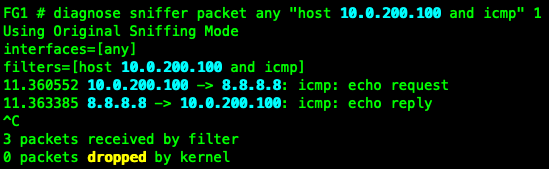
レベル1
パケットのヘッダサマリ情報のみ表示。
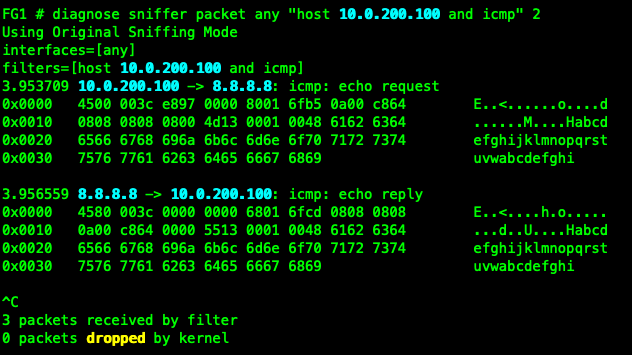
レベル2
パケットのヘッダサマリとIPヘッダとデータ部分を表示
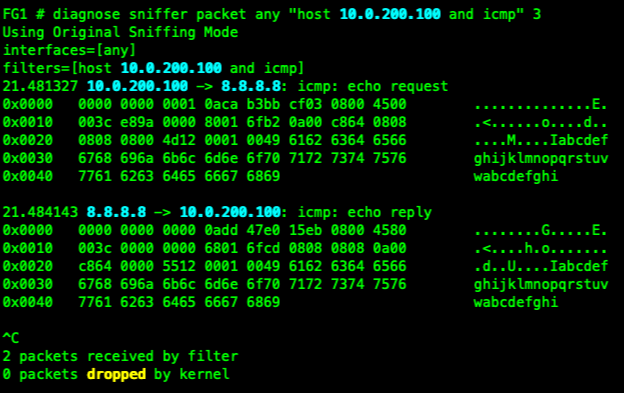
レベル3
パケットのヘッダサマリとイーサヘッダ、IPヘッダとデータ部分を表示
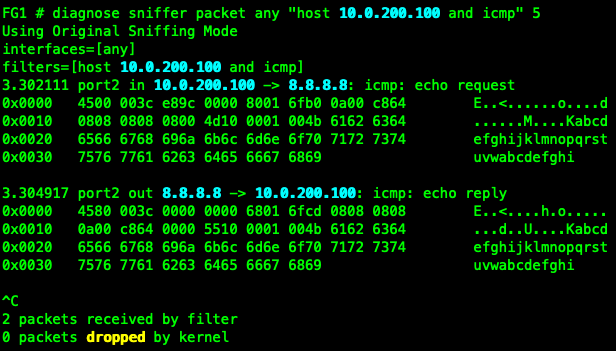
レベル4
パケットのヘッダサマリとインタフェース情報を表示
レベル5
パケットのヘッダサマリとインタフェース情報にIPヘッダ、データ部分を表示
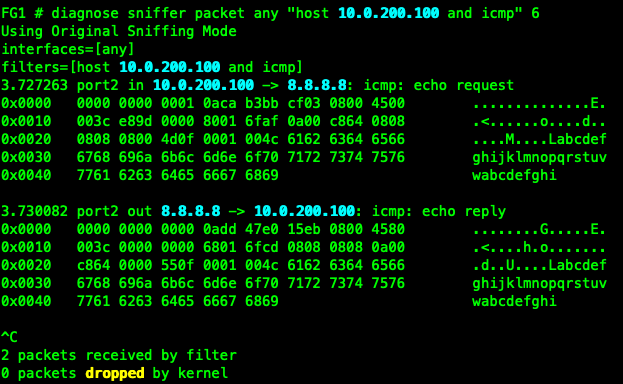
レベル6
パケットのヘッダサマリとインタフェース情報にイーサヘッダ、IPヘッダ、データ部分を表示
取得回数
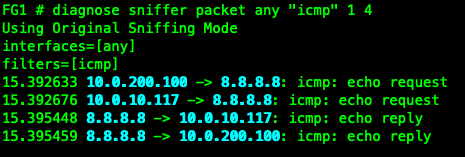
詳細レベル1で4パケットを取得。
diagnose sniffer packet any “icmp” 1 4
タイムスタンプ
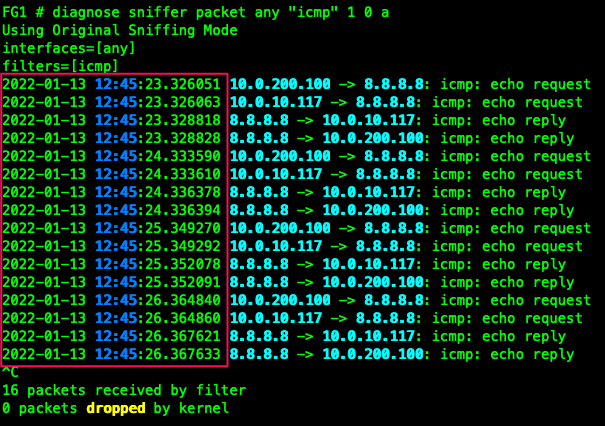
UTC時刻表示(a)
diagnose sniffer packet any “icmp” 1 0 a
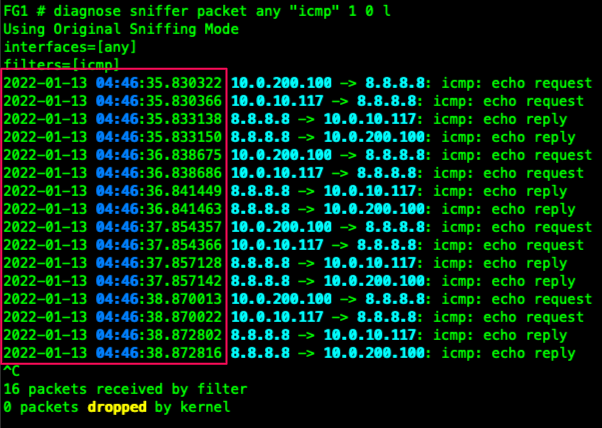
ローカル時刻表示(l:Lの小文字)
diagnose sniffer packet any “icmp” 1 0 l
よく使用するキャプチャ
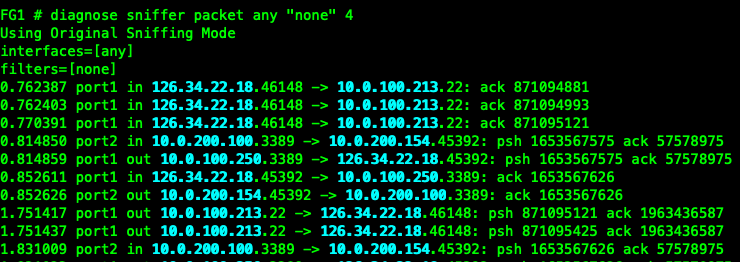
すべてのインタフェースですべてのパケット
diagnose sniffer packet any none 4
ホスト間の特定プロトコル通信
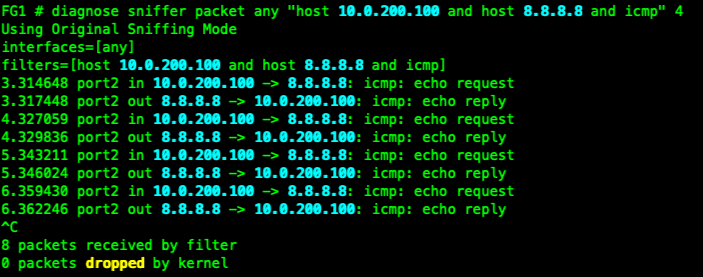
10.0.200.100と8.8.8.8間のICMPパケット。複数条件は、and や or で記述します。
diagnose sniffer packet any ” host 10.0.200.100 and host 8.8.8.8 and icmp” 4
送信元、宛先アドレスを指定
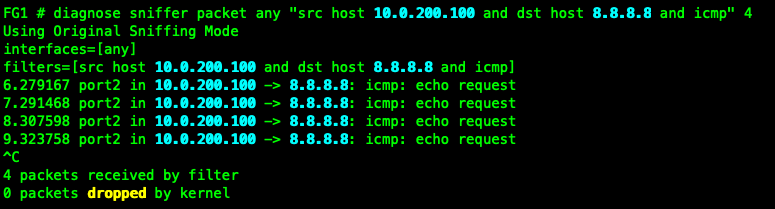
送信元10.0.200.100 宛先 8.8.8.8のICMPパケット。
diagnose sniffer packet any “src host 10.0.200.100 and dst host 8.8.8.8 and icmp” 4
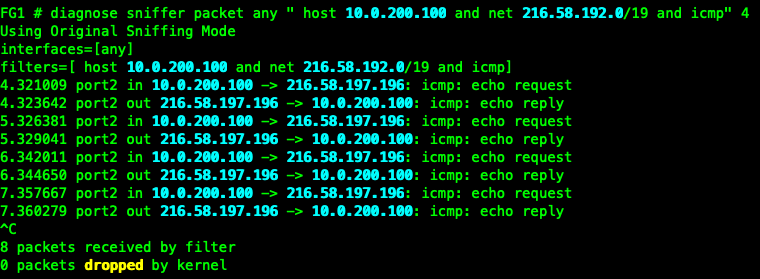
ネットワークセグメントを指定
10.0.200.100と216.58.192.0/19間のICMPパケット。
diagnose sniffer packet any ” host 10.0.200.100 and net 216.58.192.0/19 and icmp” 4
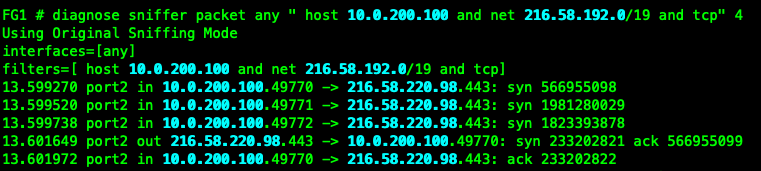
すべてのTCPパケットを指定
10.0.200.100と216.58.192.0/19間のTCPパケット。
diagnose sniffer packet any ” host 10.0.200.100 and net 216.58.192.0/19 and tcp” 4
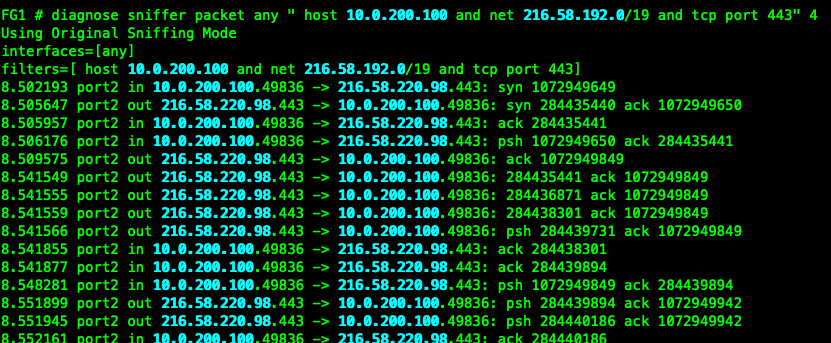
TCPポート番号を指定
10.0.200.100と216.58.192.0/19間のTCPポート番号443のパケット。
diagnose sniffer packet any ” host 10.0.200.100 and net 216.58.192.0/19 and tcp port 443″ 4
TCPフラグ(SYN・RST)
TCPヘッダで、”先頭何バイト目の値がいくつか”を指定して、条件設定します。例えば、TCPフラグ(SYNやRSTなど)は、TCPヘッダを0からはじめて13番目の1バイトの中に含まれます。
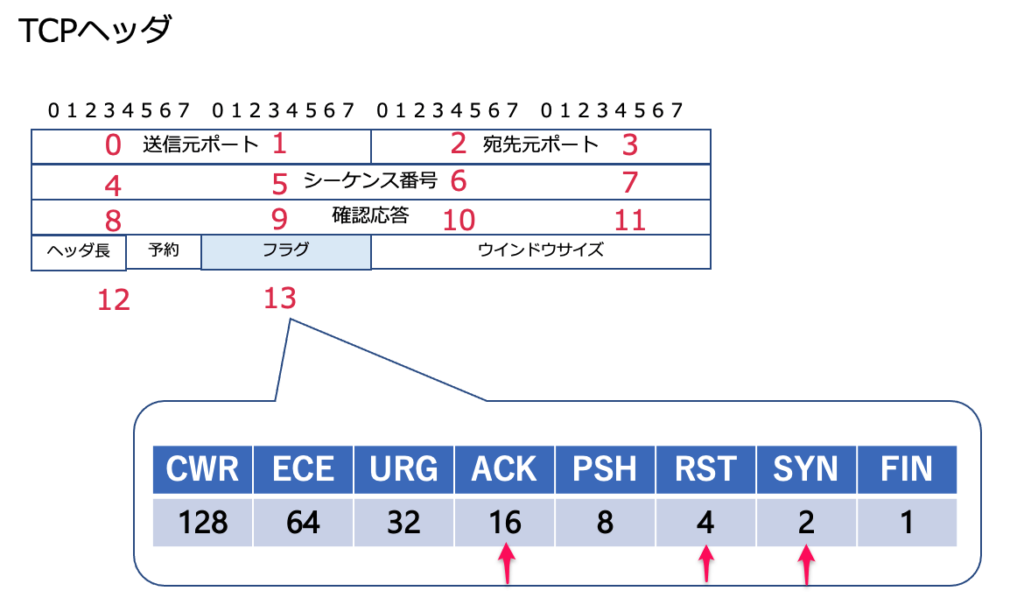
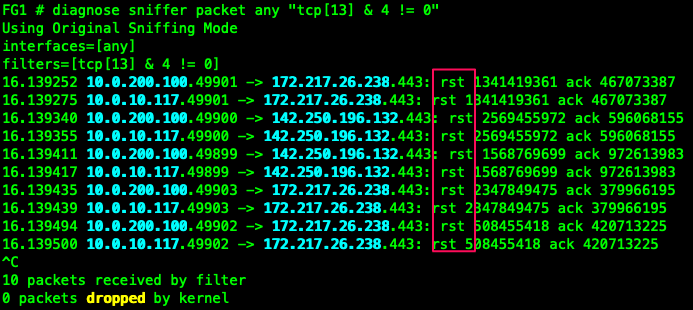
TCPのRSTパケット
TCPヘッダ13番目の1バイトと4 ( 上の図でいうRSTフラグのみ1にした1バイト(00000100) )の論理積が0でないので、RSTのビットが1である条件となります。
diagnose sniffer packet any “tcp[13] & 4 != 0”
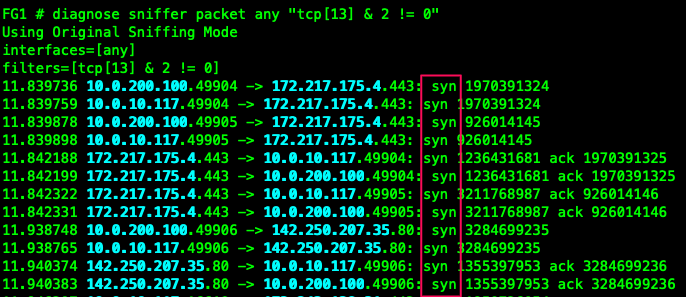
TCPのSYNパケット
RSTフラグ同様に、SYNフラグのみ1にした1バイト(00000010))の論理積が0でない条件とします。
diagnose sniffer packet any “tcp[13] & 2 != 0”
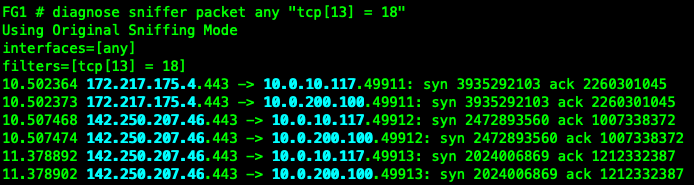
TCP のSYN ACKフラグ
SYN/ACKの場合は、SYNが2、ACKが16 の合計18であるため、tcp[13]の値が18であることを条件とします。
diagnose sniffer packet any “tcp[13] = 18”
コメント